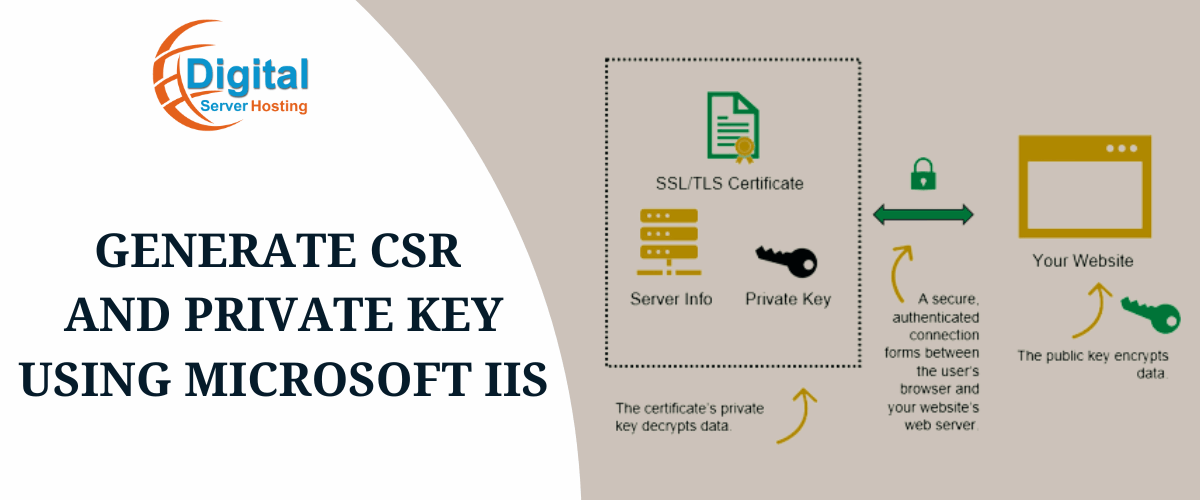
Securing websites and applications with SSL/TLS certificates is crucial for protecting sensitive data and ensuring trust between users and servers. In this blog post, we will delve into the process of generating a Certificate Signing Request (CSR) and a private key using Microsoft Internet Information Services (IIS). By following this step-by-step guide, you can easily generate CSR and private keys using Microsoft IIS. Let's dive in and empower your web infrastructure with enhanced security and encryption capabilities.
To generate a Certificate Signing Request (CSR) using Microsoft Internet Information Services (IIS), you can follow these steps:
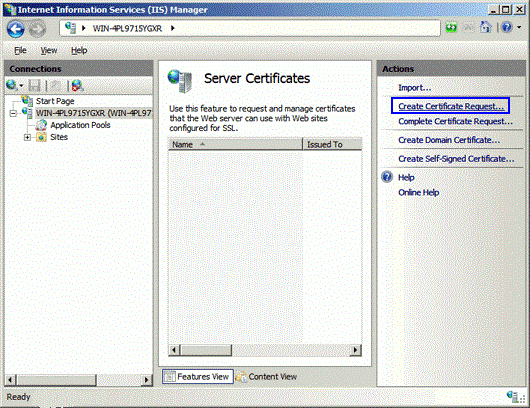
1. Open the IIS (Internet Information Services) Manager on your server.
2. Select the name of your server in the Connections pane on the left-hand side.
3. In the center pane, double-click on the "Server Certificates" feature.
4. Click the "Create Certificate Request" link on the right-hand side. This will open the "Request Certificate" wizard.
5. In the "Distinguished Name Properties" window, enter the following information:
- Common Name (CN): The fully qualified domain name (FQDN) for which you want to generate the certificate (e.g., www.example.com).
- Organization (O): The legally registered name of your organization.
- Organizational Unit (OU): The department or division within the organization.
- City/locality (L): The city where your organisation is located.
- State/province (S): The state or province where your organization is located.
- Country/region (C): The two-letter country code (e.g., US, GB, etc.) for your organization.
Note: The above information should be accurate and consistent with your details.
6. Click on the "Next" button.
Related Topic: How to Create .Well-known directory for SSL Domain Authentication
7. On the "Cryptographic Service Provider Properties" window, leave the default values unchanged and click "Next."
8. In the "File Name" window, specify the path and file name where you want to save the CSR file. Ensure you have write permissions to the selected location.
9. Click on the "Finish" button to generate the CSR file. The next window will display the contents of the CSR. Copy the entire text, including the "-----BEGIN CERTIFICATE REQUEST-----" and "-----END CERTIFICATE REQUEST-----" lines.
Now, you can use the copied CSR to request a certificate from a trusted certificate authority (CA) or generate a self-signed certificate.
To generate a private key, it is automatically created when you generate the CSR. The private key is stored securely on your server and is not included in the CSR or the resulting certificate. You may also want to check How to Generate a CSR in Windows Server.
Note: It's crucial to keep the private key secure and never share it with anyone.
Back-Up Private Key
To back up a private key on Microsoft Internet Information Services (IIS), you can use the built-in Certificate Export Wizard. The wizard allows you to export the certificate along with its associated private key to a Personal Information Exchange (PFX) file. Here's how you can perform the backup:
1. Open the Microsoft Management Console (MMC) by pressing the Windows key + R, typing "MMC," and hitting Enter.
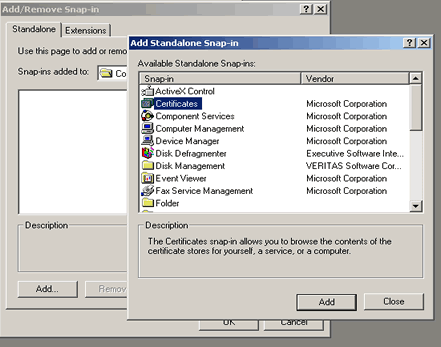
2. In the MMC window, go to "File" and select "Add/Remove Snap-in."
3. In the "Add or Remove Snap-ins" window, select "Certificates" from the list on the left and click the "Add" button.
4. In the "Certificates snap-in" window, choose the "Computer account" option and click "Next."
5. Select "Local computer" and click "Finish."
6. Click on the Close button on the snap-in list window. Then, click "OK" in the "Add or Remove Snap-ins" window.
7. Expand the "Certificates (Local Computer)" node, then expand the "Personal" folder, and finally select the "Certificates" folder.
8. Locate the certificate that you want to back up, right-click it, and select "All Tasks" > "Export."
9. The Certificate Export Wizard will open. Click "Next" to start the export process. Select the "Yes, export the private key" option and click "Next."
Related Topic: SSL Installation Process Without Control Panel on Windows Server
10. Choose the "Personal Information Exchange - PKCS #12 (.PFX)" option and enable the checkbox for "Include all certificates in the certification path if possible." Click "Next" to continue.
11. Set a password for the exported file. This password will be required when importing the certificate in the future. Enter the password twice and on click "Next"
12. Specify the path and filename for the exported file (e.g., C:\backup\certificate.pfx).
13. Click "Next" and then "Finish" to complete the export process.
You will receive a confirmation message stating that the export was successful. Click "OK" to close the wizard.
Now you have successfully backed up your certificate and private key to a PFX file. Make sure to store this file securely, as it contains sensitive information. You may also want to check SSL Installation Process Without Control Panel.
Convert To RSA Private Key Format
To convert a private key to RSA private key format, you need to ensure that the private key is already in a compatible format such as PEM (Privacy-Enhanced Mail) or DER (Distinguished Encoding Rules). If your private key is not in one of these formats, you'll need to convert it first.
1. Install OpenSSL if you don't have it already. You can download it from the OpenSSL website or use your operating system's package manager to install it.
2. Open a command prompt or terminal window.
3. Convert the private key to PEM format if it's not already in that format. If your private key is already in PEM format, you can skip this step. The following command converts a DER private key to PEM format:
openssl rsa -inform DER -outform PEM -in private_key.der -out private_key.pem
Replace private_key.der with the path to your DER private key file, and private_key.pem with the desired output file name for the PEM-formatted private key.
4. Convert the PEM private key to RSA private key format. Use the following command:
openssl rsa -in private_key.pem -out private_key_rsa.pem
Replace private_key.pem with the path to your PEM private key file, and private_key_rsa.pem with the desired output file name for the RSA-formatted private key.
After executing the above steps, you should have a private key in RSA private key format (PEM-encoded) saved in the private_key_rsa.pem file.